.nbt中生成您的StructureFeature文件,大多数普通的StructureFeatures都简单地覆盖了给定的Piece类中的generate方法This is an old revision of the document!
拼图非常适合用于地牢和村庄等高级结构,并且可以让您花费更多的时间在实际构建内容上,而不是将其与程序生成代码搞混。
可以找到带有完成代码的存储库 here.
StructureFeature是高级的Feature:它跟踪其位置和范围,并具有从结构文件中生成自身的能力1)。 如果有帮助,您可以将其视为结构 +功能。 我们需要为拼图生成的结构创建一个。 首先,创建一个扩展StructureFeature <DefaultFeatureConfig>的类2) 特征命名约定为“结构名称” +“特征”; 一些典型的示例是EndCityFeature,OceanRuinFeature和VillageFeature。
注意:虽然Feature是世界上生成的事物的专有名称,但我们将添加的内容称为Structure。 这是为了区分StructureFeature和标准Feature。
我们将按原样保留构造函数。Function <Dynamic <?»参数是结构配置-如果您没有任何计划将其弄乱,则可以简单地将DefaultFeatureConfig :: deserialize传递给super:
public ExampleFeature(Function<Dynamic<?>, ? extends DefaultFeatureConfig> config) {
    super(config);
}
shouldStartAt回答问题“我应该在给定的块中开始生成吗?” VanillaTempleFeature是vanilla提供的一个类,它为这个问题提供了答案:它可以确保每个结构与其他相同类型的结构隔开。 标准乡村功能使用相同的逻辑,但不是该类别的子级。 通过返回true,每个块都将具有您的功能。 这对于测试非常有用,因此我们现在将使用该路由。
@Override
public boolean shouldStartAt(ChunkGenerator<?> chunkGenerator, Random random, int x, int z) {
    return true;
}
getName 是您的结构的名称。 它用于几件事,包括:
原版约定是适当大写的标题。Igloo,Village和Fortress都是有效的。3)
@Override
public String getName() {
    return "Example Feature";
}
getRadius的确切用法仍在讨论中,但是(作为作者)我的猜测是它与块内的翻译有关。 半径为4的结构可以在块边界内移动,而半径为8的结构将始终居中。 这可能是错误的。 目前,半径应为结构的一半; 如果您的结构将占用多个块(或全部填充),则返回8。
@Override
public int getRadius() {
    return 2;
}
最后,getStructureStartFactory是您的StructureFeature的生成部分。 您必须返回一个工厂方法来创建新的StructureStarts -我们可以简单地通过方法引用构造函数。 我们的实现将如下所示,ExampleStructureStart是本教程的下一步:
@Override
public StructureStartFactory getStructureStartFactory() {
    return ExampleStructureStart::new;
}
我们完成的ExampleFeature类:
StructureStart is like the initialization stage of generating our structure in the world. For now, create a simple child class with a constructor that also overrides initialize:
To understand what happens here, we'll have to dive into jigsaws (https://minecraft.gamepedia.com/Jigsaw_Block) and structure blocks (https://minecraft.gamepedia.com/Structure_Block).
Structure Blocks are a simple way of saving a structure to a .nbt file for future use. Jigsaws are a component of structure blocks that assemble multiple structures into a single one; similar to normal jigsaws, each piece of the structure connects at a jigsaw block, which is like a connection wedge in a puzzle piece. We'll assume you're familiar with saving structures– if you aren't, read up on the structure block page before going any further.
The jigsaw menu consists of 3 fields: * target pool * attachment type * turns into
When thinking about this as a puzzle, the target pool is the group of puzzle pieces you can search through. If you have a total of 10 pieces, one target pool may have 7 of the total pieces. This field is how a jigsaw specifies, “Hi, I'd like a piece from group B to connect to me!” In the case of a village, this may be a road saying, “Give me a house!” The target pools of 2 jigsaws do not have to match: the requestor gets to decide who they select from. It is not defining what type the given jigsaw block is, but rather what type should be on the other side.
The attachment type can be seen as a more specific filter within target pools– a jigsaw can only connect to other jigsaws with the same attachment type. This is like the type of connector on a puzzle piece. The usages for this are a little bit more specific.
Finally, the “turns into” field is simply what the jigsaw is replaced with after it finds a match. If the jigsaw is inside your cobblestone floor, it should probably turn into cobblestone.
Here's an example implementation: the given jigsaw will draw from the tutorial:my_pool structure pool, looks for any jigsaws with the tutorial:any type, and turns into cobblestone when it's done.
Our finalized structure will consist of multiple colored squares connecting to each other. It will have a white or a black square in the center, and orange, magenta, light blue, and lime squares branching off on the sides randomly. Here is the setup of our 2 initial squares:
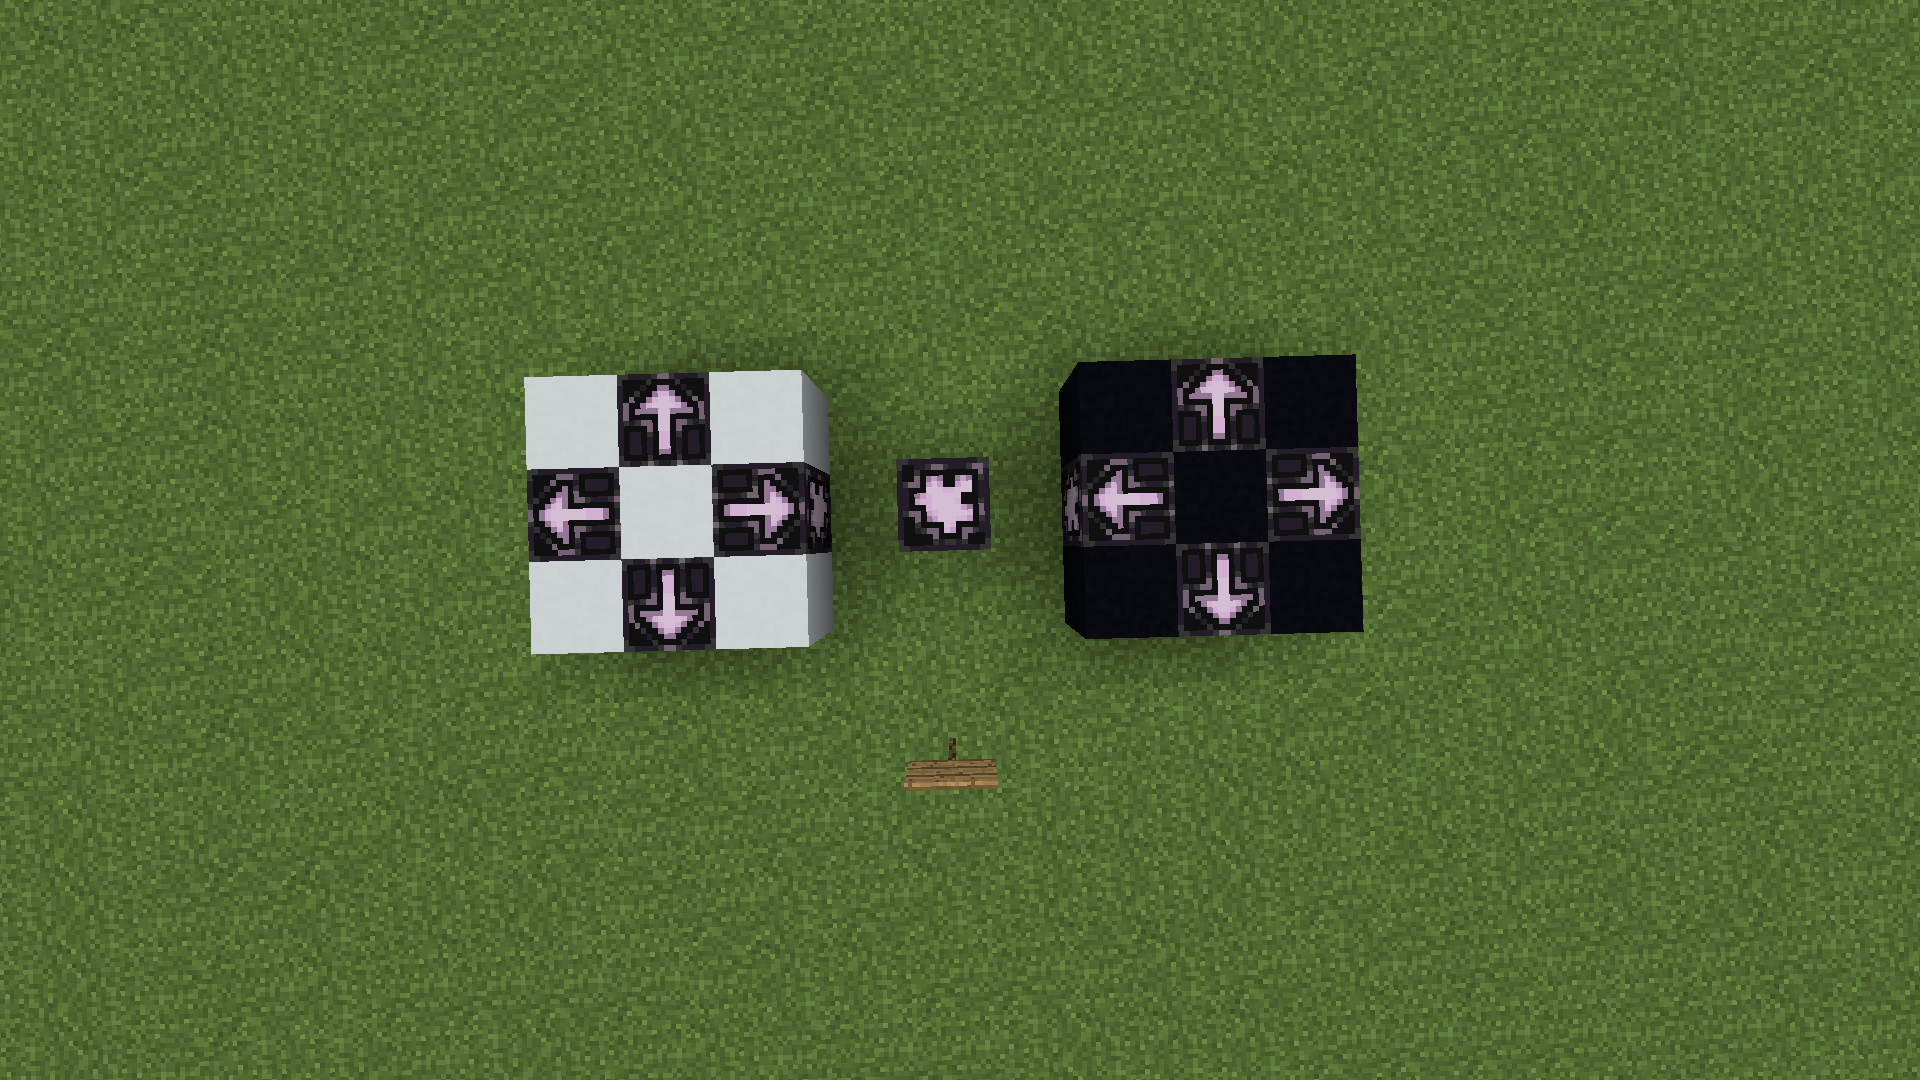
This jigsaw will ask for any other jigsaw that: * is in the tutorial:color_pool target pool * has an attachment type of tutorial:square_edge It then turns into white concrete to match the rest of the platform.
For demo purposes, we've made 2 starting platforms: one is white, and one is black. The only difference is what they turn into. We'll save these as structure files using structure blocks:
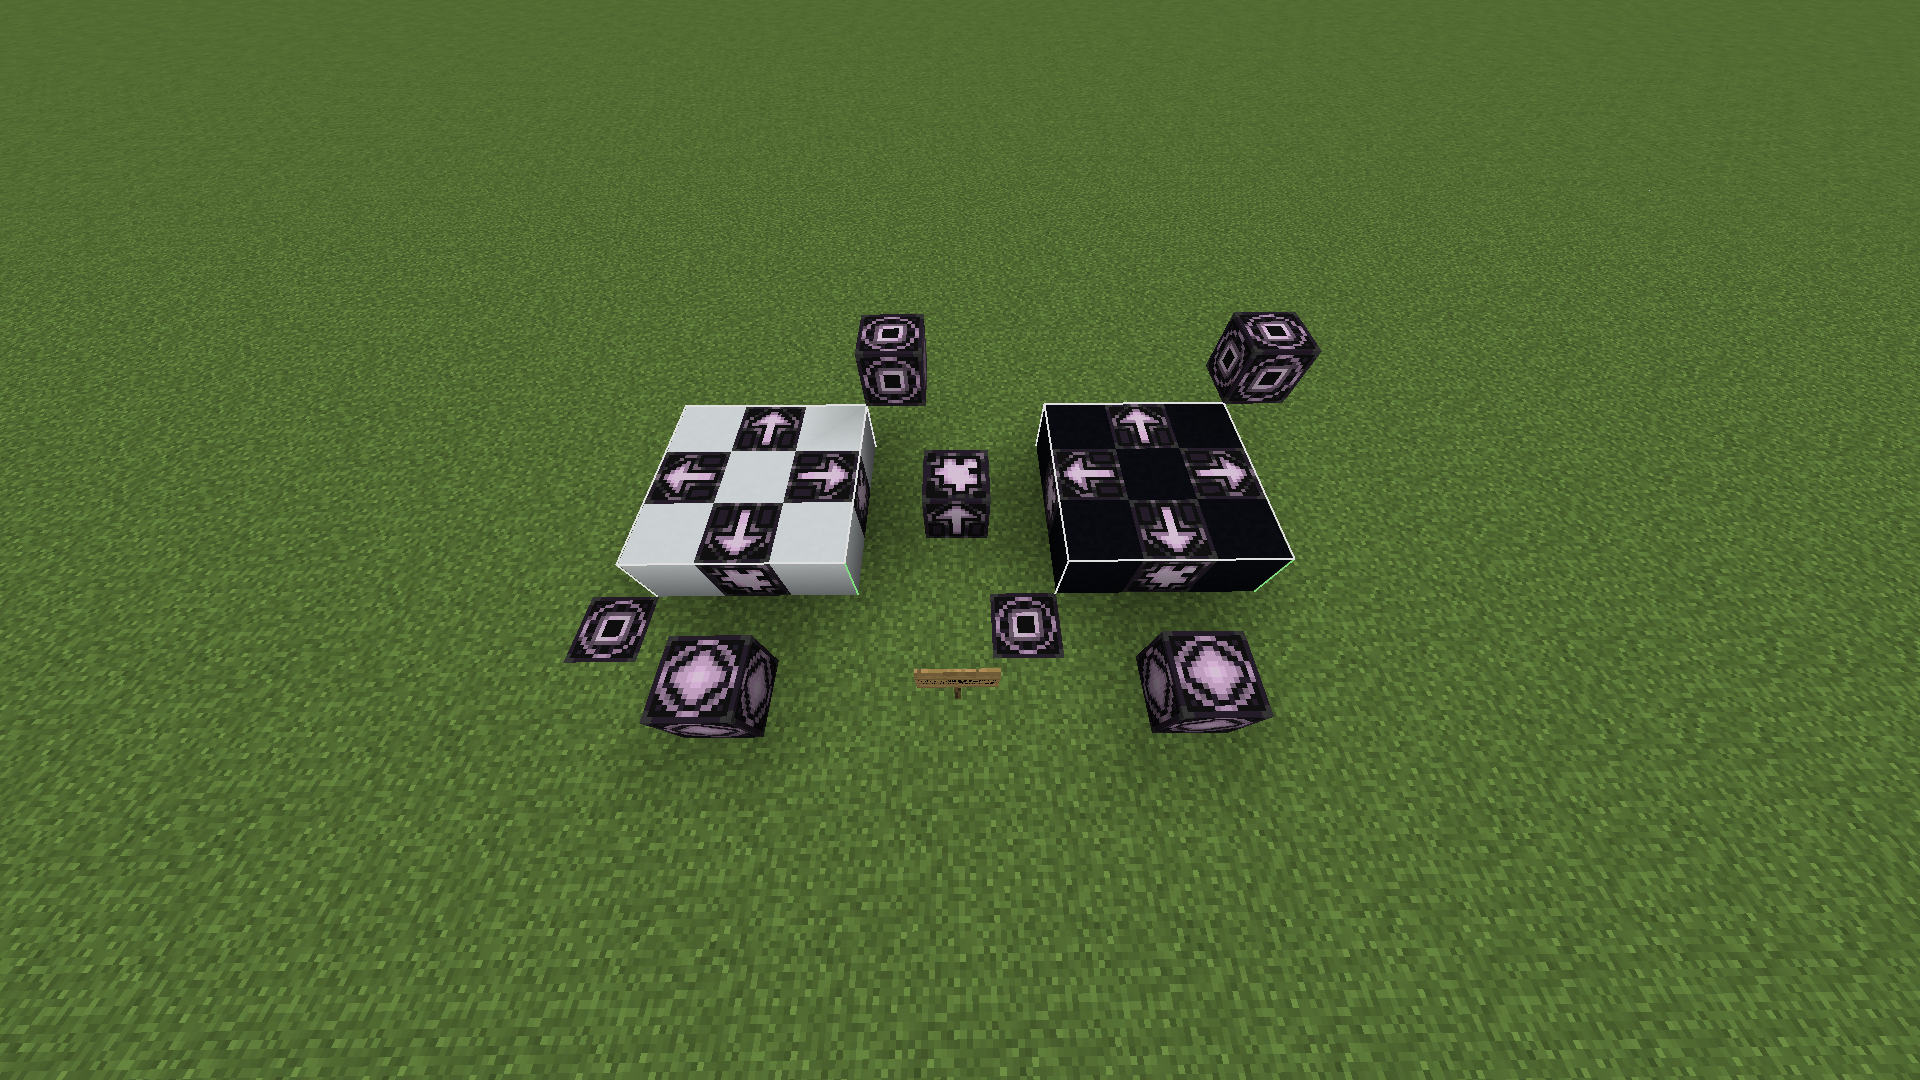
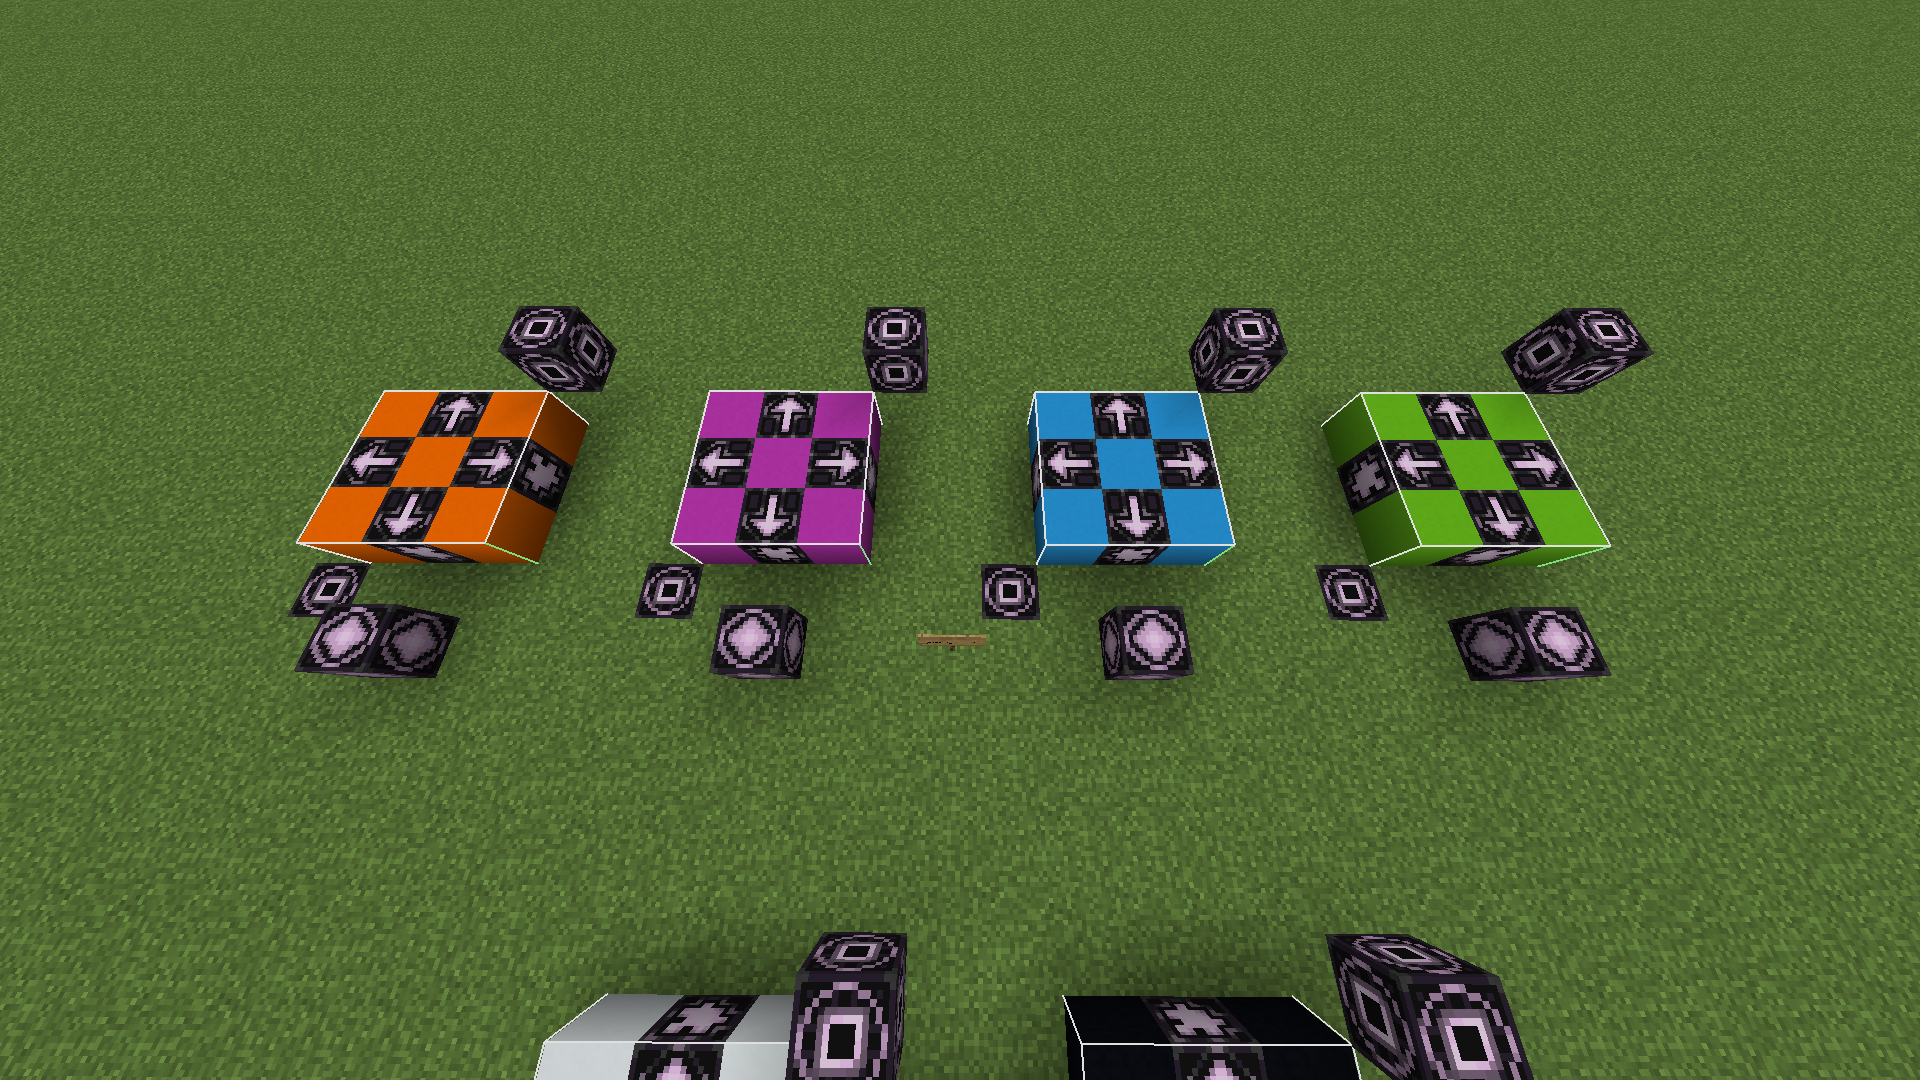
For our randomized edge platforms, we've made 4 extra squares of different colors. Again, despite being used for a different purpose, the jigsaw construction is the same aside from the “turns into” field.
We now have 6 saved .nbt files. These can be found in our world save folder under generated:
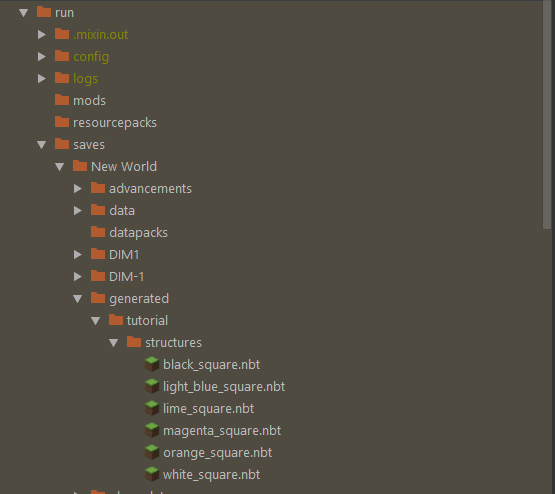
For usage, we'll move these to resources/data/tutorial/structures, where “tutorial” is your modid:
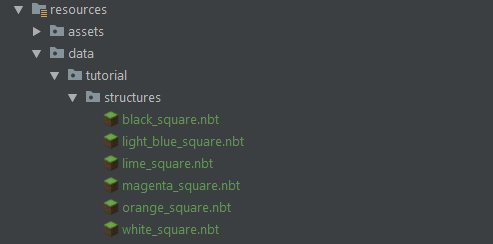
The setup is complete! We now have 6 total squares. Let's briefly recap the goal: * have a white or black square selected as the center for our structure * have a pool of the 4 other colors * branch off from the center square with our 4 extra colors
Let's head back to our ExampleStructureStart class. First, we'll need 2 Identifiers to label our 2 pools (black&white, 4 colors):
private static final Identifier BASE_POOL = new Identifier("tutorial:base_pool");
private static final Identifier COLOR_POOL = new Identifier("tutorial:color_pool");
Remember: every jigsaw ends up searching through the color pool, but we still have a base pool! This is to keep our black & white squares out of the outside generated squares. It's also going to be our origin pool, where we randomly select 1 structure from to begin our generation.
In a static block at the bottom of our class, we're going to register our structure pools using StructurePoolBasedGenerator.REGISTRY:
Here, we're registering 2 pools (base & color) and then adding their respective children to them. The StructurePool constructor is as follows: * registry name of the pool, same as target pool at top of a jigsaw * @Draylar if you know what this one does * a list of pool elements * the projection type of the pool
For the list of elements, we add Pairs4) of pool elements and integers. The string passed into the element is the location of the structure in the data directory, and the int is the weight of the element within the entire target pool. Using 1 for each element ensures each one will be picked evenly.
The projection is how the pool is placed in the world. Rigid means it will be placed directly as is, and terrain matching means it will be bent to sit on top of the terrain. The latter may be good for a wheat field structure that moves with the terrain shape, whereas the first would be better for houses with solid floors.
Now all we have to do is add our starting piece in our initialize method:
@Override
public void initialize(ChunkGenerator<?> chunkGenerator, StructureManager structureManager, int x, int z, Biome biome) {
    StructurePoolBasedGenerator.addPieces(BASE_POOL, 7, ExamplePiece::new, chunkGenerator, structureManager, new BlockPos(x * 16, 150, z * 16), children, random);
    setBoundingBoxFromChildren();
}
The Identifier is the starting pool to select from, the int is the size of the entire structure (with 7 being “7 squares out”), and the 3rd argument is a factory for the piece we'll register in a second.
This portion is very simple. A piece represents one section or element in your full structure. You'll need to create a basic piece class, and we'll register it later:
public class ExamplePiece extends PoolStructurePiece {

    ExamplePiece(StructureManager structureManager_1, StructurePoolElement structurePoolElement_1, BlockPos blockPos_1, int int_1, BlockRotation blockRotation_1, MutableIntBoundingBox mutableIntBoundingBox_1) {
        super(ExampleMod.EXAMPLE_PIECE, structureManager_1, structurePoolElement_1, blockPos_1, int_1, blockRotation_1, mutableIntBoundingBox_1);
    }

    public ExamplePiece(StructureManager manager, CompoundTag tag) {
        super(manager, tag, ExampleMod.EXAMPLE_PIECE);
    }
}
Where ExampleMod.EXAMPLE_PIECE is a reference to our registered piece.
We'll need to register our structure as both a feature and a structure feature, and also register our piece. Registering your structure as a StructureFeature is optional, and is used for saving it to the chunk. If the world is stopped half-way through your structure loading, having this registered will allow it to continue after the world is re-opened. If it is not registered to a structure feature and this happens, the structure will stop half-way through (which would mostly only occur in larger, multiple chunk wide structures).
最后,我们必须生成我们的结构。 将其添加到每个生物群系的一个基本示例是:
Registry.BIOME.forEach(biome -> {
	biome.addFeature(GenerationStep.Feature.RAW_GENERATION, Biome.configureFeature(EXAMPLE_FEATURE, new DefaultFeatureConfig(), Decorator.NOPE, DecoratorConfig.DEFAULT));
	biome.addStructureFeature(EXAMPLE_FEATURE, new DefaultFeatureConfig());
});